> ## Documentation Index
> Fetch the complete documentation index at: https://kb.snagr.co.uk/llms.txt
> Use this file to discover all available pages before exploring further.
# How to add users to project?
 **Website**
User list is the list of people who will be able to access SnagR.
**What is required to set up a user?**
**Permissions settings**
It is important to revisit your current issue rectification workflow, lay out the parties that are involved and their role and responsibilities. With that it becomes clear how permissions should be defined for your project in SnagR. Learn more about [workflow and permissions](/en/set-up-project/accounts-and-permissions-project-level/how-to-set-permissions-issues) before proceeding.
**Full name and email address**
The email address of a user will be used for account reminders and report notifications. If the email address is invalid the user will fail to receive email notifications from SnagR.
**Website**
User list is the list of people who will be able to access SnagR.
**What is required to set up a user?**
**Permissions settings**
It is important to revisit your current issue rectification workflow, lay out the parties that are involved and their role and responsibilities. With that it becomes clear how permissions should be defined for your project in SnagR. Learn more about [workflow and permissions](/en/set-up-project/accounts-and-permissions-project-level/how-to-set-permissions-issues) before proceeding.
**Full name and email address**
The email address of a user will be used for account reminders and report notifications. If the email address is invalid the user will fail to receive email notifications from SnagR.
 It is handy to have a username naming standard and the same initial password for all users, so that in a training session it is simple for everyone to pick up their account credentials.
For example, the username will always be the first part of the email address, i.e., [peterbenett@snagr.com.au](mailto:peterbenett@snagr.com.au,) will have username peterbenett, and the initial password will always be 12345.
**How to add a user?**
When everything is ready, click Add Users to proceed.
It is handy to have a username naming standard and the same initial password for all users, so that in a training session it is simple for everyone to pick up their account credentials.
For example, the username will always be the first part of the email address, i.e., [peterbenett@snagr.com.au](mailto:peterbenett@snagr.com.au,) will have username peterbenett, and the initial password will always be 12345.
**How to add a user?**
When everything is ready, click Add Users to proceed.
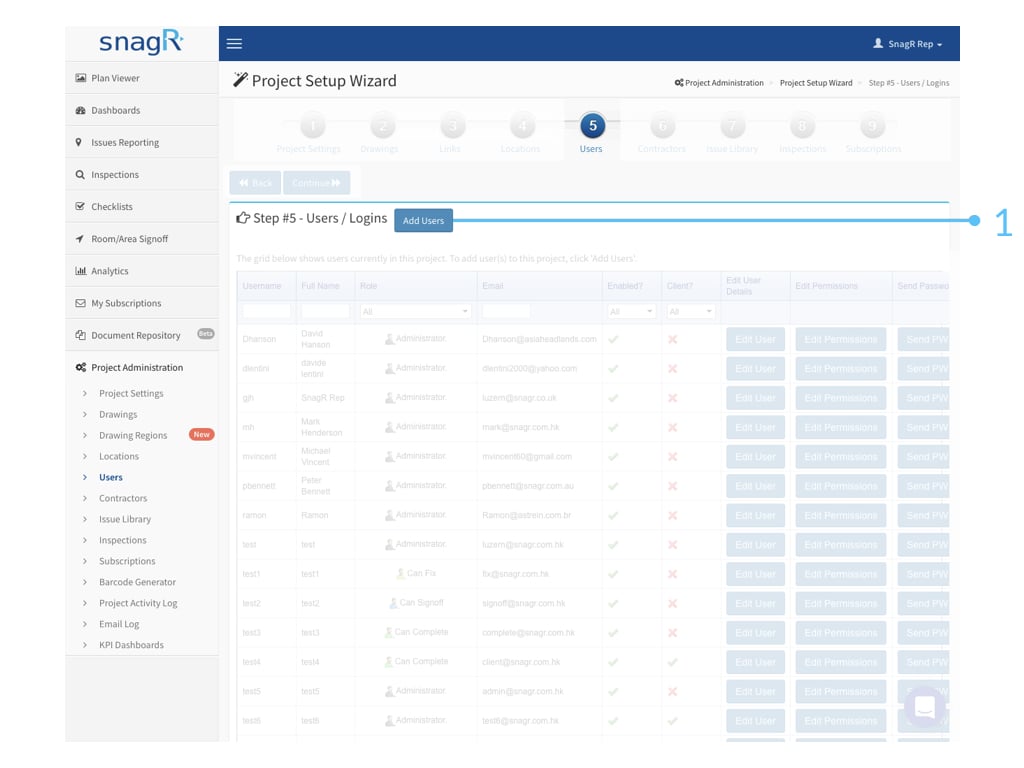 Next you can choose to create a user manually or by an Excel import.
**Adding users manually**
Next you can choose to create a user manually or by an Excel import.
**Adding users manually**
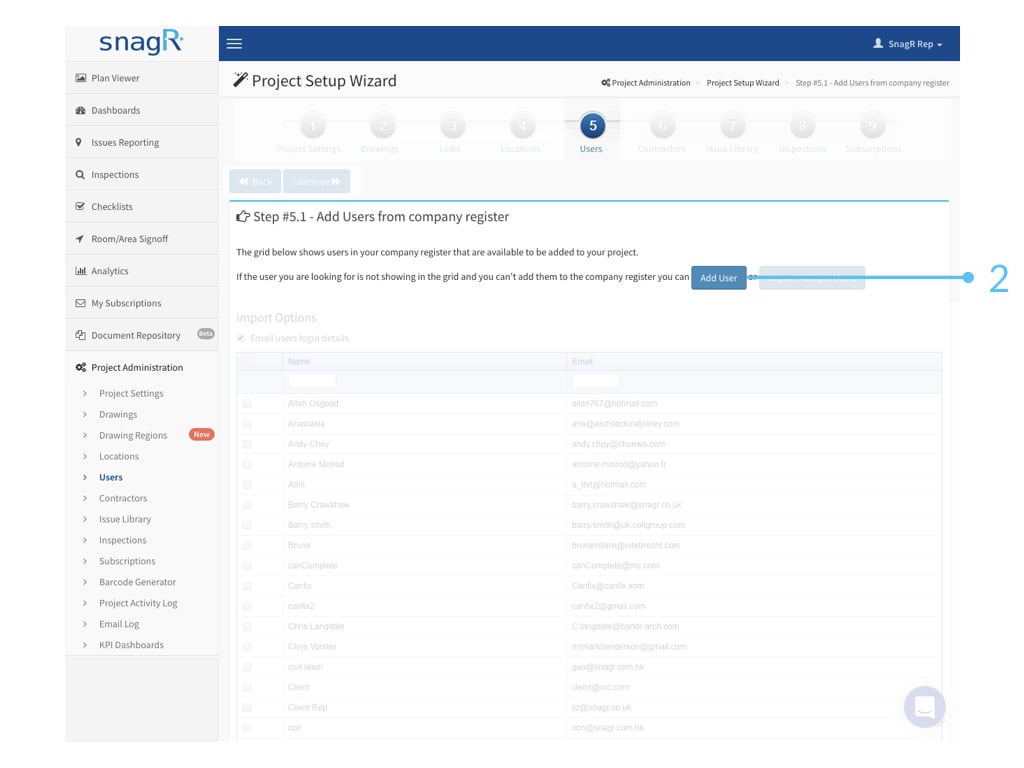
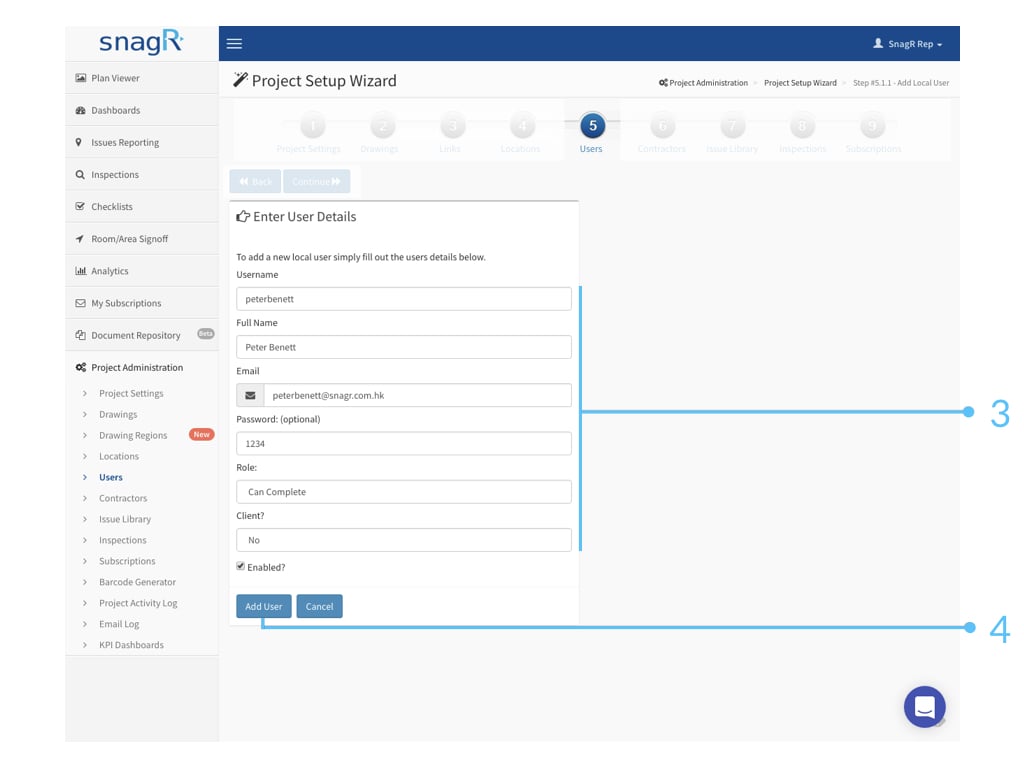
 What's **Enabled?** If you would like the user to access the system, check enabled. If you would not like the user to have access anymore, uncheck the box. They would not be able to login to the system then. Note a user can be disabled but cannot be deleted. This is to protect the project data such that if a user has created any issues or forms previously the record always remain.
What's **C\*\*\*\*lient?** When you set a user to be client, they can only see the issues created by themselves, and they are also the only ones to be able to close those issues. Learn more at permissions.
**Wants to be quicker? Import multiple users with Excel**
What's **Enabled?** If you would like the user to access the system, check enabled. If you would not like the user to have access anymore, uncheck the box. They would not be able to login to the system then. Note a user can be disabled but cannot be deleted. This is to protect the project data such that if a user has created any issues or forms previously the record always remain.
What's **C\*\*\*\*lient?** When you set a user to be client, they can only see the issues created by themselves, and they are also the only ones to be able to close those issues. Learn more at permissions.
**Wants to be quicker? Import multiple users with Excel**
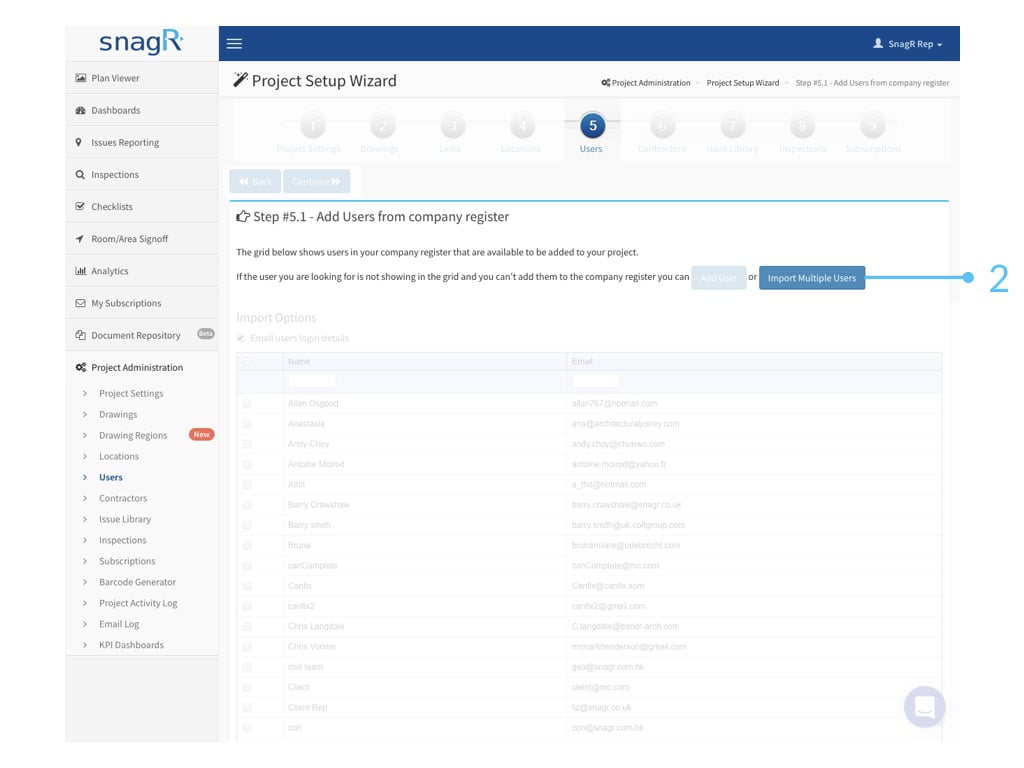
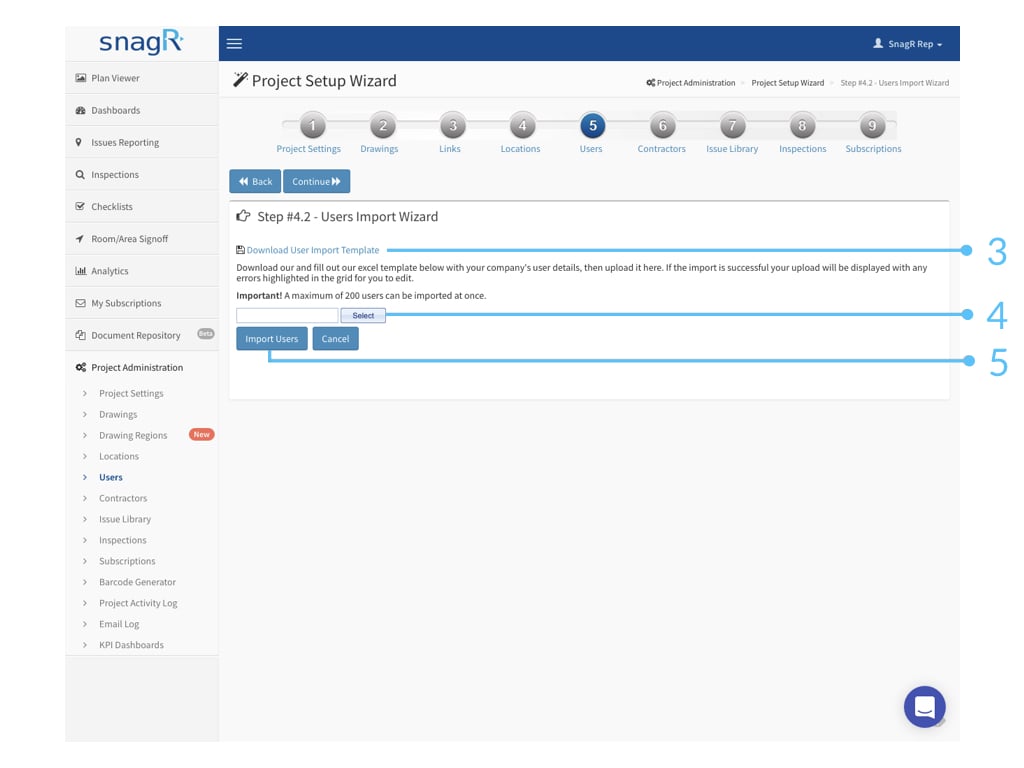
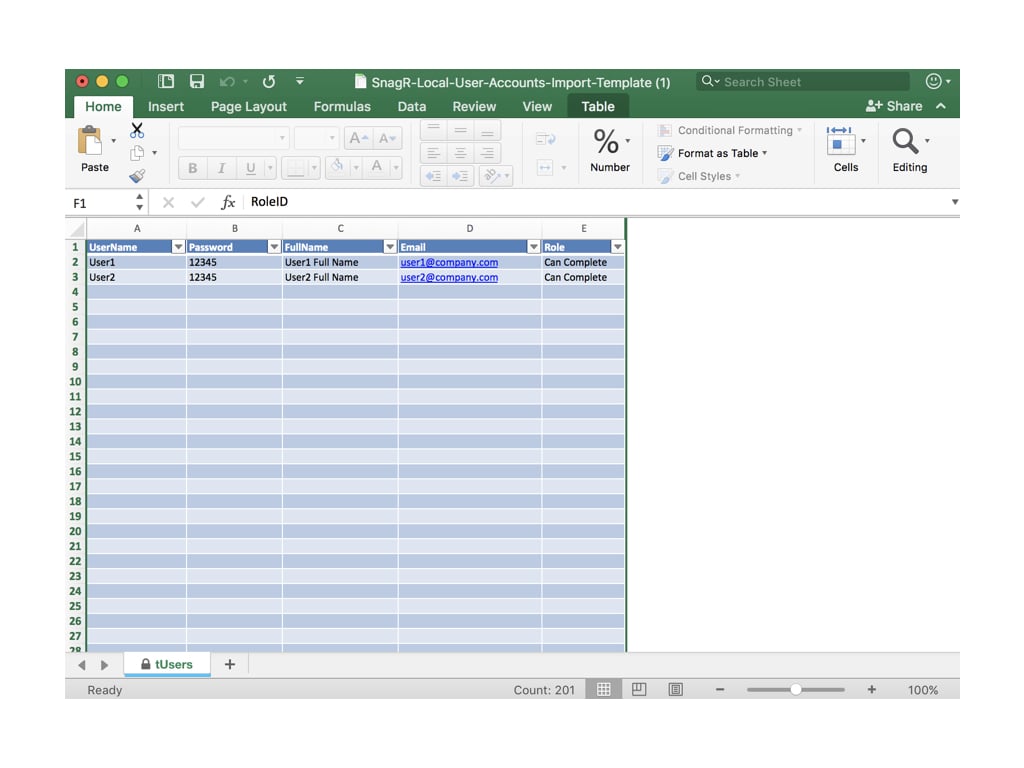 Be sure the spreadsheet is named tUsers so that the import matches to the database table.
**How about adding a user who exists on other project(s)?**
When you attempt to add new users but the system gives you an error telling you that this user already exists but you do not see him/her on the project at all. It is likely they exist on other projects within the same company.
Once you click Add Users, a table of existing users in the same company always appear.
Click [here](/en/set-up-project/accounts-and-permissions-company-level/add-user-at-the-company-level) to know how to add the users to the company level.
Be sure the spreadsheet is named tUsers so that the import matches to the database table.
**How about adding a user who exists on other project(s)?**
When you attempt to add new users but the system gives you an error telling you that this user already exists but you do not see him/her on the project at all. It is likely they exist on other projects within the same company.
Once you click Add Users, a table of existing users in the same company always appear.
Click [here](/en/set-up-project/accounts-and-permissions-company-level/add-user-at-the-company-level) to know how to add the users to the company level.
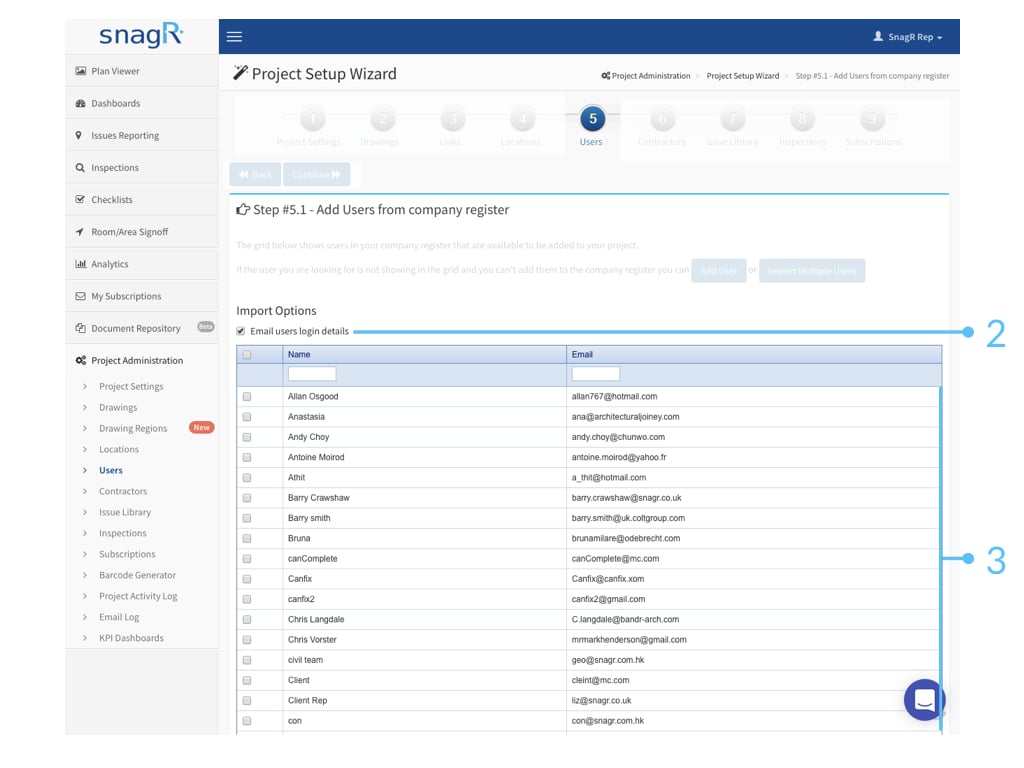
 If it's a long list
  , use Ctrl + F (Windows) or Command + F (Mac) to find your users.
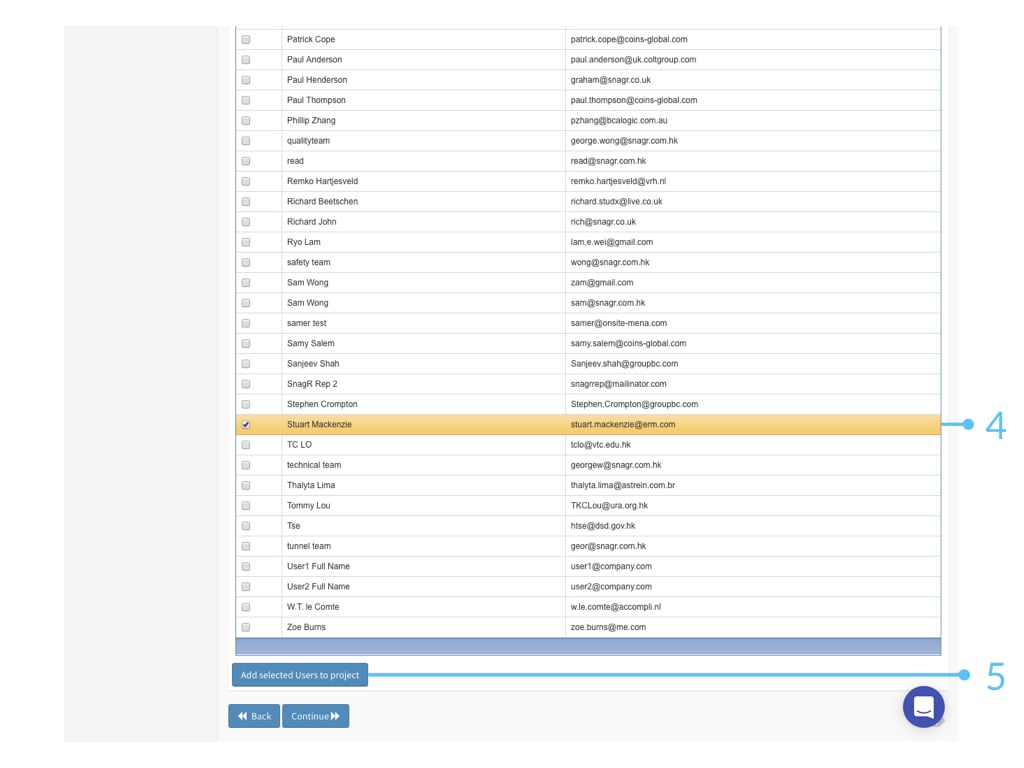
Click Add Selected Users to project at the bottom.
, use Ctrl + F (Windows) or Command + F (Mac) to find your users.
Click Add Selected Users to project at the bottom.